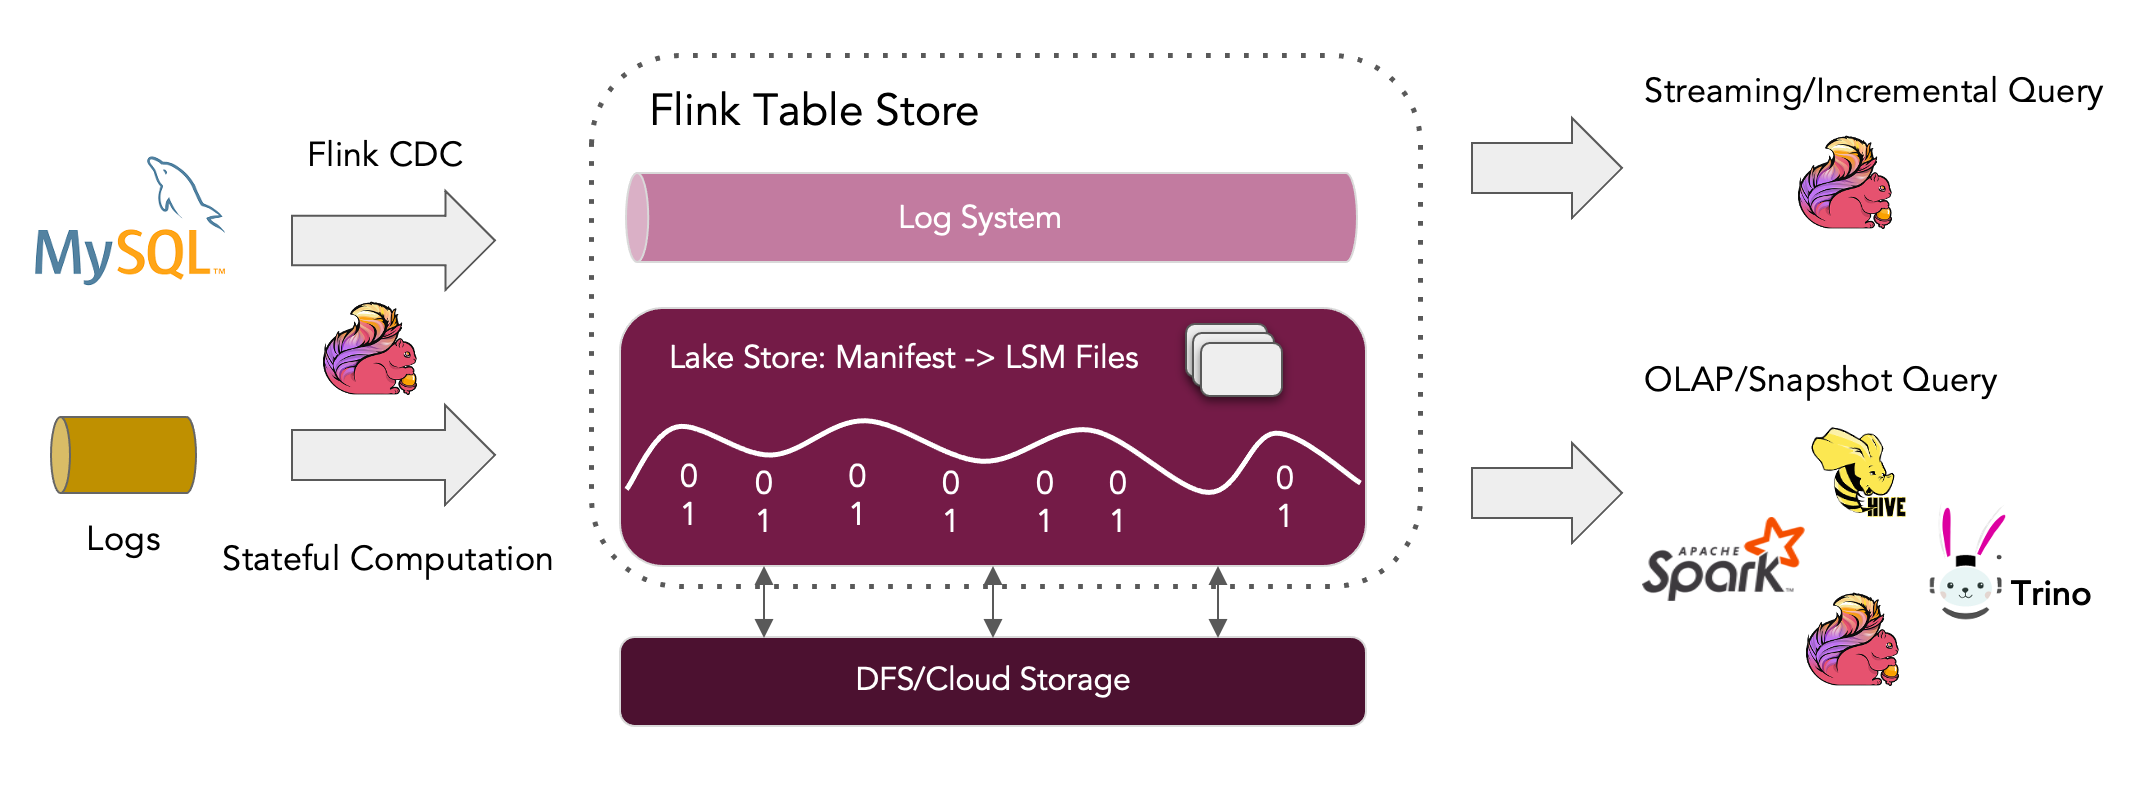
本文通过一个示例来简要介绍如何使用 Apache Flink Table Store。
步骤一:下载 Flink
注意:Flink Table Store 仅从 Flink 1.14 开始支持。
本示例使用的是 Flink 1.15.2 版本,使用 wget 下载:
1 wget https://dlcdn.apache.org/flink/flink-1.15.2/flink-1.15.2-bin-scala_2.12.tgz
下载完成之后,解压文件:
1 tar -xzf flink-1.15.2-bin-scala_2.12.tgz
本示例中,flink 的安装目录为 /mnt/d/flink-1.15.2 。为便于本文的后续说明,这里使用 ${FLINK_HOME} 代指 flink 的安装目录。
解压后的文件目录如下:
1
2
3
4
5
6
7
8
9
10
11
12
13
➜ flink-1.15.2 ll total 616K -rwxrwxrwx 1 root root 12K Aug 17 20:10 LICENSE -rwxrwxrwx 1 root root 600K Aug 18 00:42 NOTICE -rwxrwxrwx 1 root root 1.3K Aug 17 20:10 README.txt drwxrwxrwx 1 root root 4.0K Aug 18 00:42 bin drwxrwxrwx 1 root root 4.0K Aug 18 00:42 conf drwxrwxrwx 1 root root 4.0K Aug 18 00:42 examples drwxrwxrwx 1 root root 4.0K Aug 18 00:42 lib drwxrwxrwx 1 root root 4.0K Aug 18 00:42 licenses drwxrwxrwx 1 root root 4.0K Aug 17 20:10 log drwxrwxrwx 1 root root 4.0K Aug 18 00:42 opt drwxrwxrwx 1 root root 4.0K Aug 18 00:42 plugins
步骤二:下载 flink-table-store-dist-0.2.0.jar 下载 flink-table-store-dist-0.2.0.jar:
1 wget https://dlcdn.apache.org/flink/flink-table-store-0.2.0/flink-table-store-dist-0.2.0.jar
下载完成后,把 flink-table-store-dist-0.2.0.jar 复制到 ${FLINK_HOME}/lib 目录下:
1 cp flink-table-store-dist-0.2.0.jar ${FLINK_HOME} /lib
步骤三:下载 flink-shaded-hadoop-*.jar 这里下载的是 flink-shaded-hadoop-2-uber-2.7.5-10.0.jar:
1 wget https://repo.maven.apache.org/maven2/org/apache/flink/flink-shaded-hadoop-2-uber/2.7.5-10.0/flink-shaded-hadoop-2-uber-2.7.5-10.0.jar
将下载好的文件复制到 ${FLINK_HOME}/lib 目录下:
1 cp flink-shaded-hadoop-2-uber-2.7.5-10.0.jar ${FLINK_HOME} /lib
步骤四:启动 Flink 本地集群 进入 Flink 安装目录:
为了运行多个作业,在启动 Flink 本地集群之前需要先修改集群配置:
1 vi ./conf/flink-conf.yaml
将配置项 taskmanager.numberOfTaskSlots 由 1 改为 2:
1 taskmanager.numberOfTaskSlots: 2
启动本地集群:
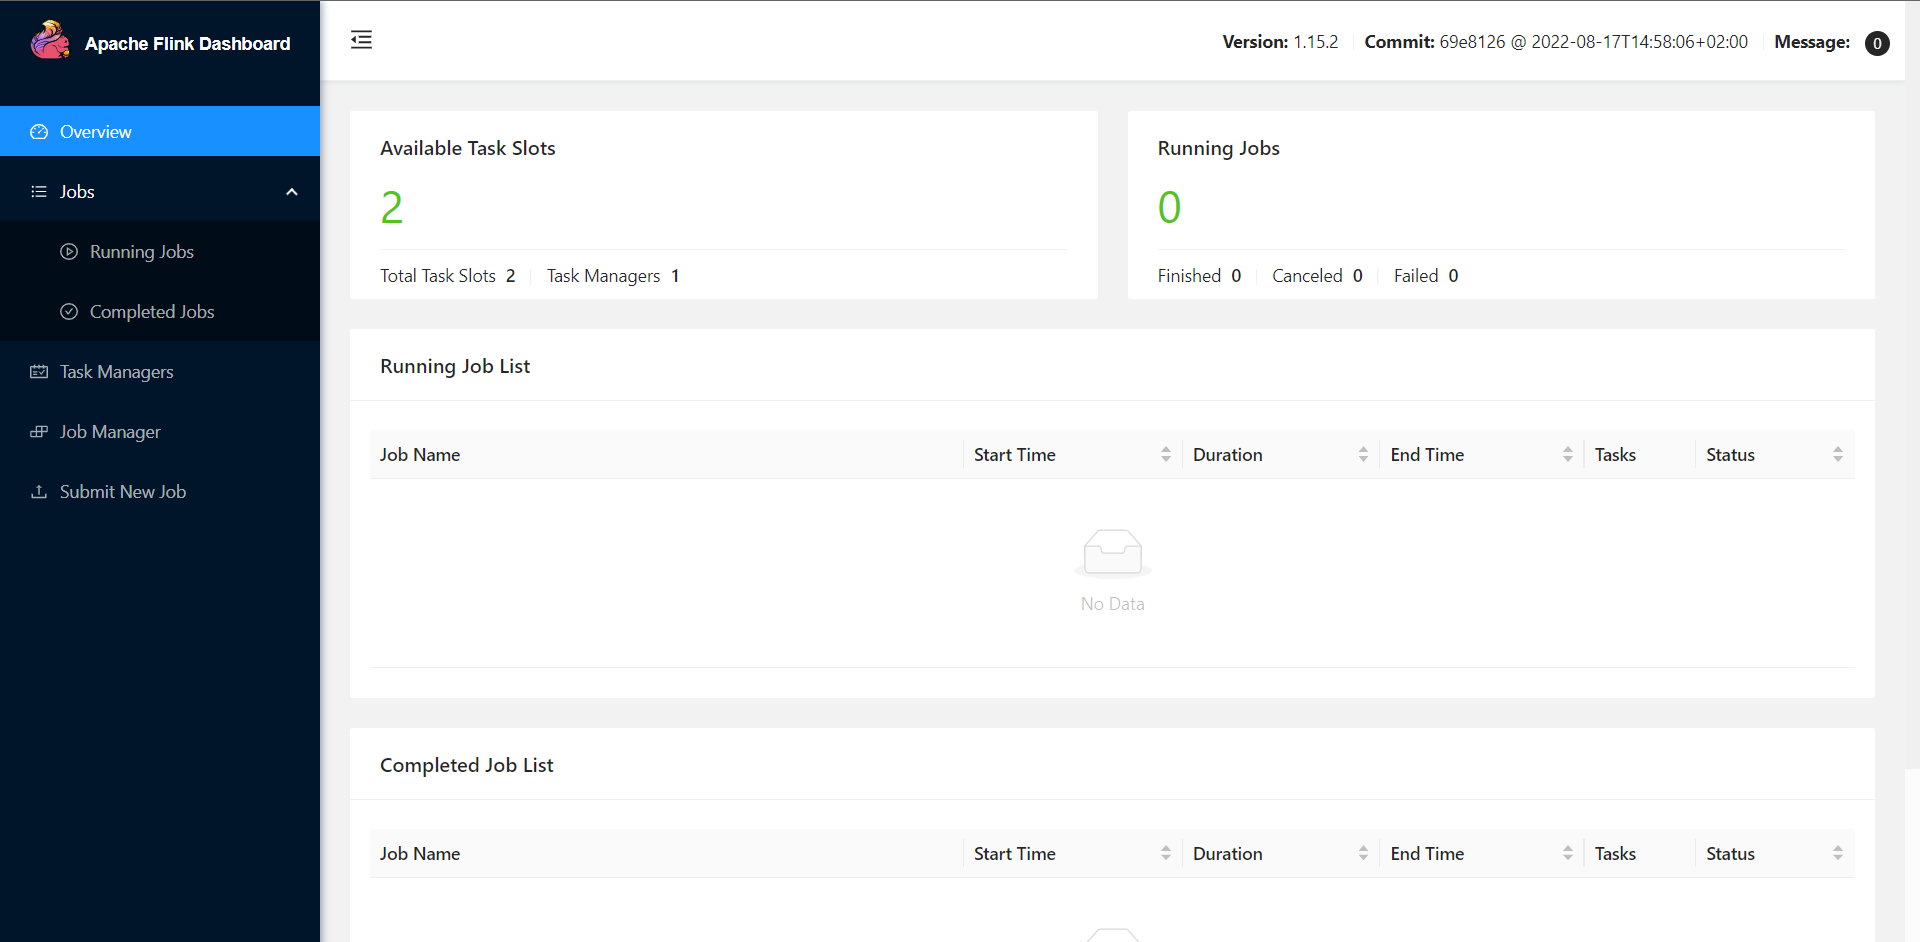
在浏览器打开链接 http://localhost:8081/ 查看 Flink 仪表盘,可以看到集群已启动并正在运行:
启动 SQL Client CLI:
1 ./bin/sql-client.sh embedded
结果如下:
1
2
3
4
5
6
7
8
9
10
11
12
13
14
15
16
17
18
19
20
21
22
23
24
25
26
27
28
29
30
31
32
33
34
35
36
37
38
39
40
41
42
43
44
45
46
47
➜ flink-1.15.2 ./bin/sql-client.sh embedded ▒▓██▓██▒ ▓████▒▒█▓▒▓███▓▒ ▓███▓░░ ▒▒▒▓██▒ ▒ ░██▒ ▒▒▓▓█▓▓▒░ ▒████ ██▒ ░▒▓███▒ ▒█▒█▒ ░▓█ ███ ▓░▒██ ▓█ ▒▒▒▒▒▓██▓░▒░▓▓█ █░ █ ▒▒░ ███▓▓█ ▒█▒▒▒ ████░ ▒▓█▓ ██▒▒▒ ▓███▒ ░▒█▓▓██ ▓█▒ ▓█▒▓██▓ ░█░ ▓░▒▓████▒ ██ ▒█ █▓░▒█▒░▒█▒ ███▓░██▓ ▓█ █ █▓ ▒▓█▓▓█▒ ░██▓ ░█░ █ █▒ ▒█████▓▒ ██▓░▒ ███░ ░ █░ ▓ ░█ █████▒░░ ░█░▓ ▓░ ██▓█ ▒▒▓▒ ▓███████▓░ ▒█▒ ▒▓ ▓██▓ ▒██▓ ▓█ █▓█ ░▒█████▓▓▒░ ██▒▒ █ ▒ ▓█▒ ▓█▓ ▓█ ██▓ ░▓▓▓▓▓▓▓▒ ▒██▓ ░█▒ ▓█ █ ▓███▓▒░ ░▓▓▓███▓ ░▒░ ▓█ ██▓ ██▒ ░▒▓▓███▓▓▓▓▓██████▓▒ ▓███ █ ▓███▒ ███ ░▓▓▒░░ ░▓████▓░ ░▒▓▒ █▓ █▓▒▒▓▓██ ░▒▒░░░▒▒▒▒▓██▓░ █▓ ██ ▓░▒█ ▓▓▓▓▒░░ ▒█▓ ▒▓▓██▓ ▓▒ ▒▒▓ ▓█▓ ▓▒█ █▓░ ░▒▓▓██▒ ░▓█▒ ▒▒▒░▒▒▓█████▒ ██░ ▓█▒█▒ ▒▓▓▒ ▓█ █░ ░░░░ ░█▒ ▓█ ▒█▓ ░ █░ ▒█ █▓ █▓ ██ █░ ▓▓ ▒█▓▓▓▒█░ █▓ ░▓██░ ▓▒ ▓█▓▒░░░▒▓█░ ▒█ ██ ▓█▓░ ▒ ░▒█▒██▒ ▓▓ ▓█▒ ▒█▓▒░ ▒▒ █▒█▓▒▒░░▒██ ░██▒ ▒▓▓▒ ▓██▓▒█▒ ░▓▓▓▓▒█▓ ░▓██▒ ▓░ ▒█▓█ ░░▒▒▒ ▒▓▓▓▓▓▒▒▒▒▒▒▒▒▒▒▒▒▒▒▒▒▒▒▒▒▒▒▒░░▓▓ ▓░▒█░ ______ _ _ _ _____ ____ _ _____ _ _ _ BETA | ____| (_) | | / ____|/ __ \| | / ____| (_) | | | |__ | |_ _ __ | | __ | (___ | | | | | | | | |_ ___ _ __ | |_ | __| | | | '_ \| |/ / \___ \| | | | | | | | | |/ _ \ ' _ \| __| | | | | | | | | < ____) | |__| | |____ | |____| | | __/ | | | |_ |_| |_|_|_| |_|_|\_\ |_____/ \___\_\______| \_____|_|_|\___|_| |_|\__| Welcome! Enter 'HELP;' to list all available commands. 'QUIT;' to exit . Command history file path: /root/.flink-sql-history Flink SQL>
步骤五:创建表 依次执行以下三条 SQL 语句:
1
2
3
4
5
6
7
8
9
10
11
12
CREATE CATALOG my_catalog WITH ( 'type' = 'table-store' , 'warehouse' = 'file:/tmp/table_store' ); USE CATALOG my_catalog; CREATE TABLE word_count ( word STRING PRIMARY KEY NOT ENFORCED, cnt BIGINT );
步骤六:写入数据 依次执行以下 SQL 语句:
1 2 3 4 5 6 7 8 9 10 11 12 13 CREATE TEMPORARY TABLE word_table ( word STRING ) WITH ( 'connector' = 'datagen' , 'fields.word.length' = '1' ); SET 'execution.checkpointing.interval' = '10 s' ;INSERT INTO word_count SELECT word, COUNT (* ) FROM word_table GROUP BY word;
可以在 Flink 仪表盘看到正在运行的作业:
步骤七:OLAP 查询 依次执行以下 SQL 语句:
1 2 3 4 5 6 7 8 9 SET 'sql-client.execution.result-mode' = 'tableau' ;RESET 'execution.checkpointing.interval' ; SET 'execution.runtime-mode' = 'batch' ;SELECT * FROM word_count;
OLAP 的查询结果如下:
1
2
3
4
5
6
7
8
9
10
11
12
13
14
15
16
17
18
19
20
21
22
Flink SQL > SELECT * FROM word_count; + | word | cnt | + | 0 | 167846 | | 1 | 167779 | | 2 | 167708 | | 3 | 168591 | | 4 | 168384 | | 5 | 168587 | | 6 | 168275 | | 7 | 167705 | | 8 | 169200 | | 9 | 168222 | | a | 167486 | | b | 167603 | | c | 168221 | | d | 167459 | | e | 168599 | | f | 168335 | + 16 rows in set
可以多执行几次上面的查询 SQL 语句,并观察结果的变化。
在 Flink 仪表盘的已完成作业列表,可以看到刚刚完成执行 OLAP 查询的作业:
步骤八:流式查询 依次执行以下 SQL 语句:
1 2 3 4 5 6 SET 'execution.runtime-mode' = 'streaming' ;SELECT `interval `, COUNT (* ) AS interval_cnt FROM (SELECT cnt / 10000 AS `interval ` FROM word_count) GROUP BY `interval `;
结果输出如下:
1
2
3
4
5
6
7
8
9
10
11
12
13
14
15
16
17
18
19
20
21
22
23
24
25
26
27
28
29
30
31
32
33
34
35
36
Flink SQL > SELECT `interval `, COUNT (* ) AS interval_cnt FROM > (SELECT cnt / 10000 AS `interval ` FROM word_count) GROUP BY `interval `;+ | op | interval | interval_cnt | + | + I | 53 | 1 | | - U | 53 | 1 | | + U | 53 | 2 | | - U | 53 | 2 | | + U | 53 | 3 | | - U | 53 | 3 | | + U | 53 | 4 | | - U | 53 | 4 | | + U | 53 | 5 | | - U | 53 | 5 | | + U | 53 | 6 | | - U | 53 | 6 | | + U | 53 | 7 | | - U | 53 | 7 | | + U | 53 | 8 | | - U | 53 | 8 | | + U | 53 | 9 | | - U | 53 | 9 | | + U | 53 | 10 | | - U | 53 | 10 | | + U | 53 | 11 | | - U | 53 | 11 | | + U | 53 | 12 | | - U | 53 | 12 | | + U | 53 | 13 | | - U | 53 | 13 | | + U | 53 | 14 | | - U | 53 | 14 | | + U | 53 | 15 | | - U | 53 | 15 | | + U | 53 | 16 |
使用流模式,可以获取动态表的更改日志,并执行新的流计算。
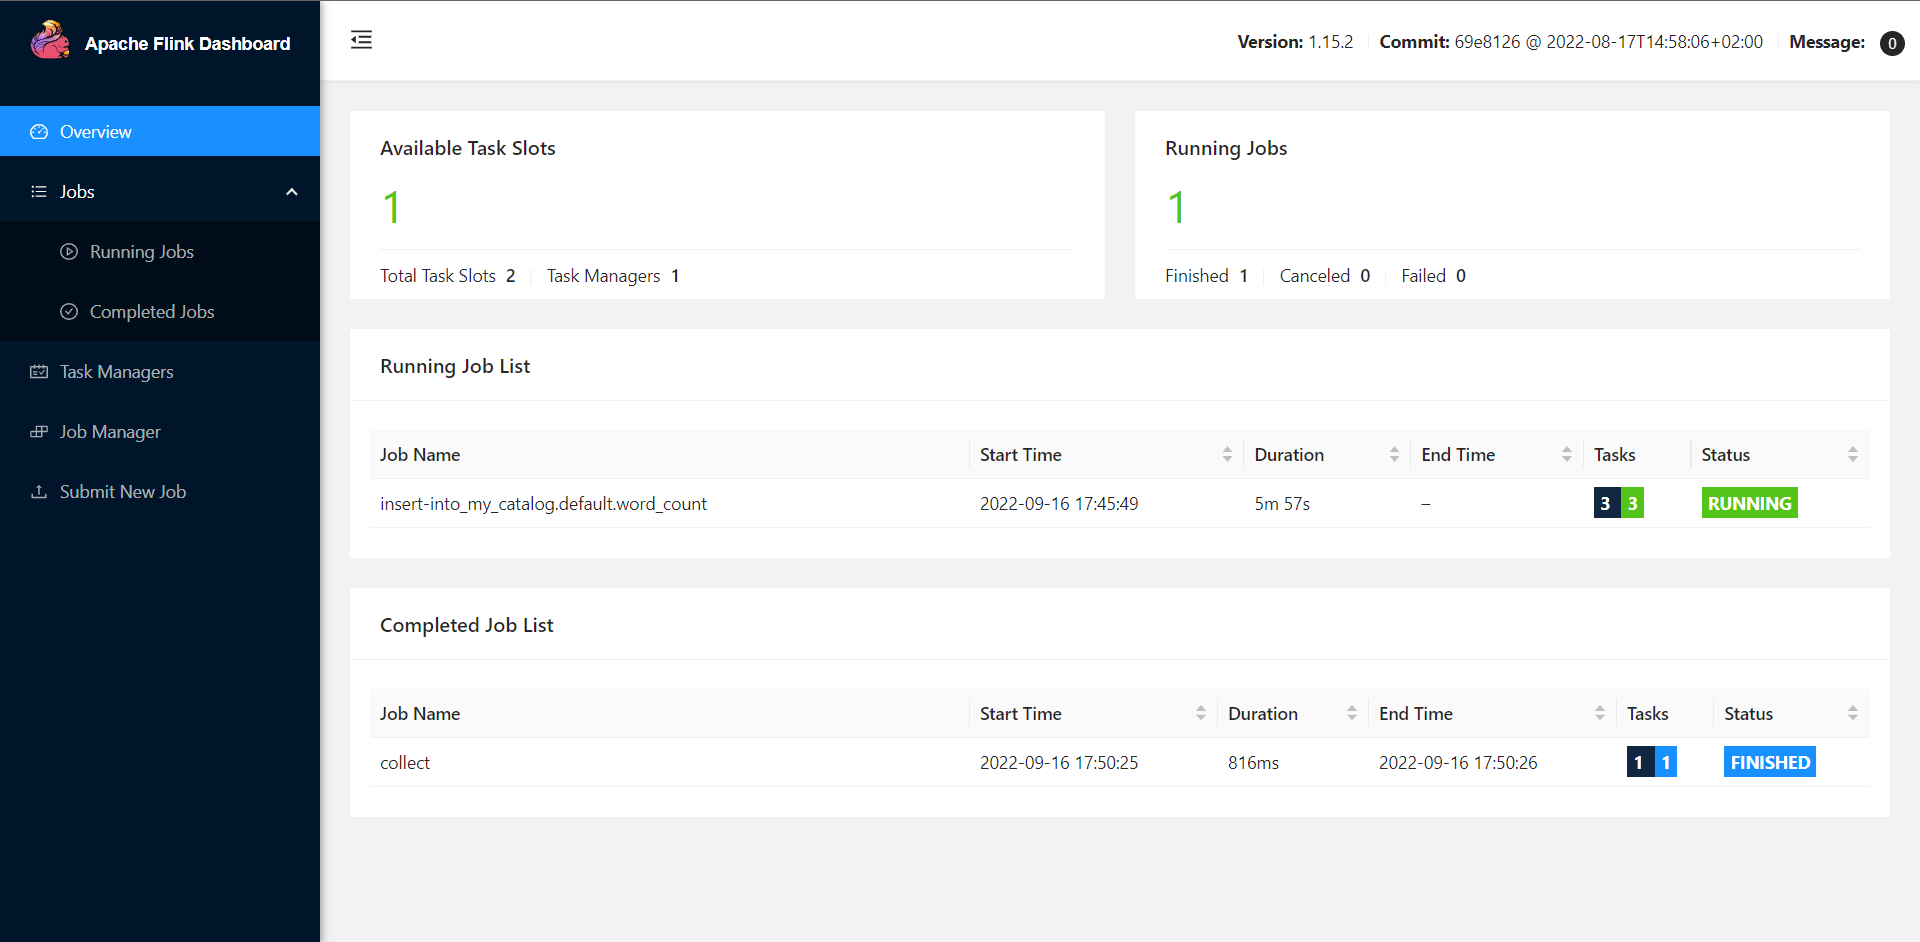
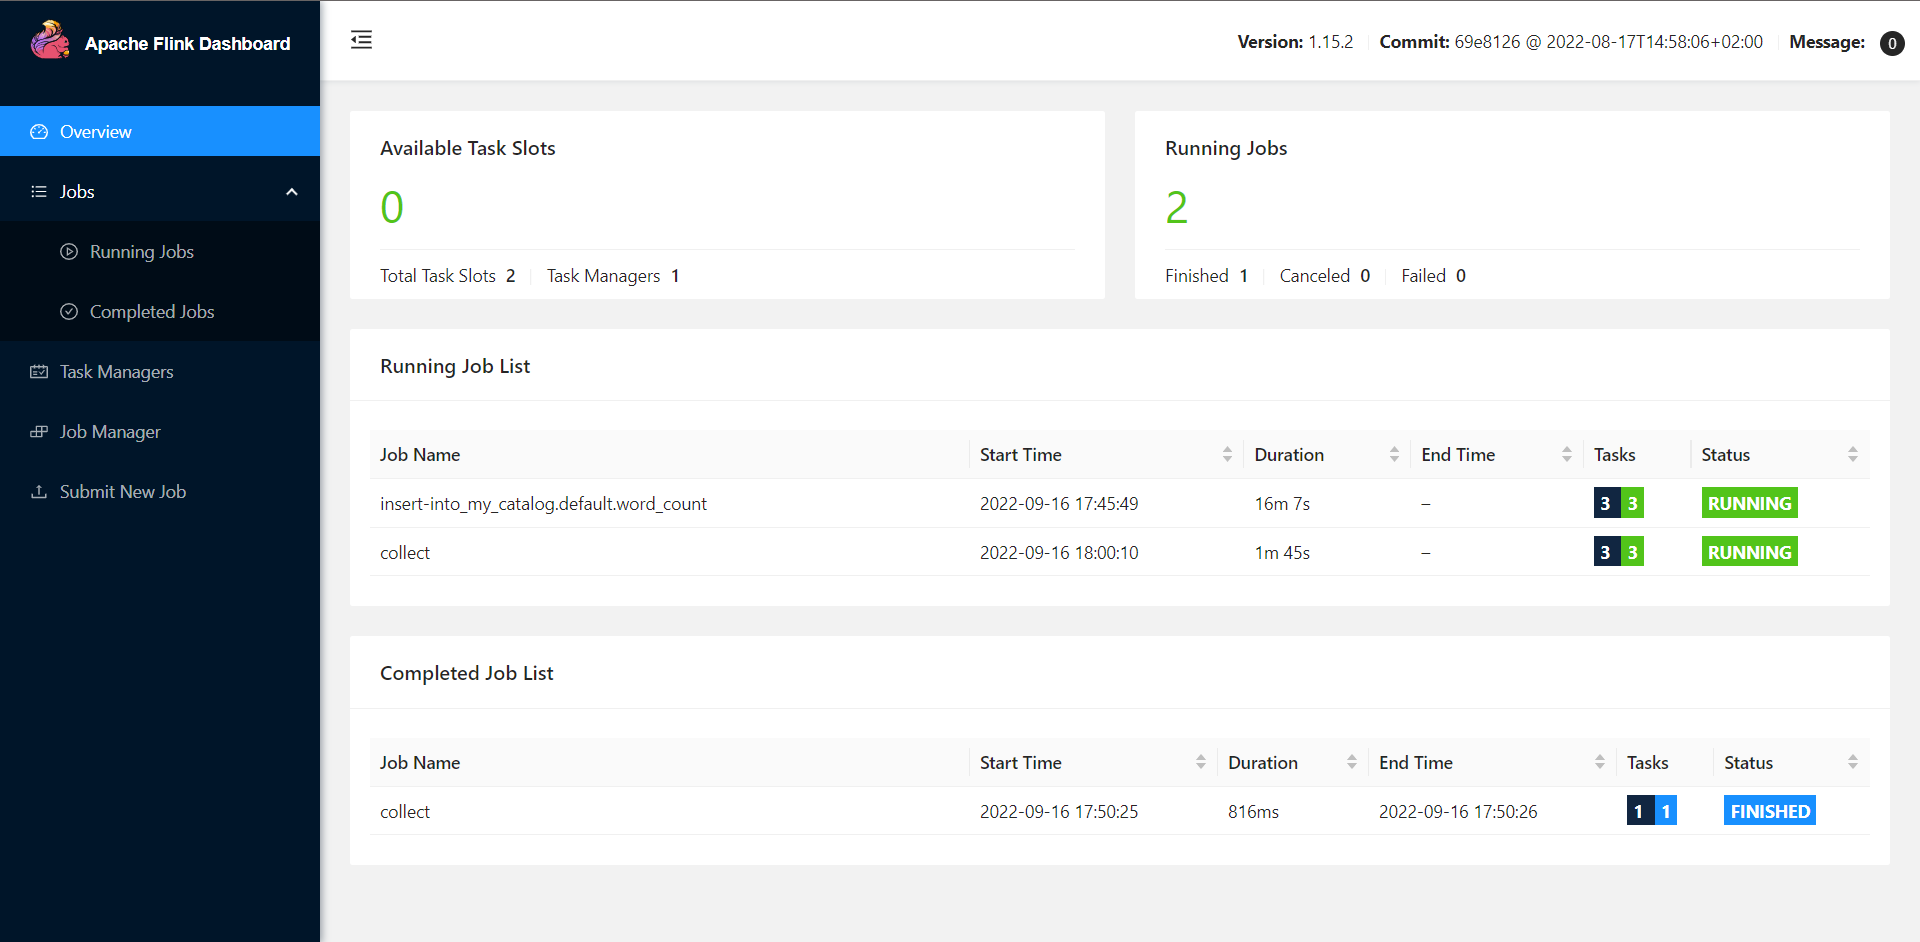
在 Flink 仪表盘的正在运行作业列表上,可以看到刚刚启动的正在运行的作业(作业名:collect):
步骤九:退出 依次打开 Flink 仪表盘上正在运行作业列表上的作业,进入作业详情页面,点击 Cancel Job 按钮,取消作业。
在 SQL Client 上依次执行以下 SQL 语句:
1 2 3 4 5 DROP TABLE word_count;EXIT;
停止 Flink 本地集群:
祝贺 恭喜你完成 Flink Table Store 的快速入门。相信你对 Flink Table Store 已经有了初步的了解。
内容来源:
https://nightlies.apache.org/flink/flink-table-store-docs-release-0.2/docs/try-table-store/quick-start/
(END)