Analyzing Redis Source Code: The Structure and Design of Hash Tables, Chained Hashing, and Incremental Rehashing
Redis offers a classic implementation of hash tables. To handle hash collisions, Redis employs chained hashing, which links data with the same hash value in a list rather than expanding the table. This ensures that all data remains accessible within the hash table. To minimize the performance impact of rehashing, Redis uses a incremental rehashing strategy, which distributes the workload of rehashing over time to reduce system overhead.
In this article, I’ll guide you through the core design principles and implementation details of Redis hash tables. By understanding how Redis manages hash collisions and optimizes rehashing, you’ll gain the tools to implement high-performance hash tables when handling large datasets in practical applications.
How does Redis Implement Chained Hashing?
Before we dive into Redis’ implementation of chained hashing, it’s essential to first understand the structure of Redis hash tables and the cause of hash collisions as data volume increases. This context will help clarify how chained hashing effectively addresses these collisions.
What is a Hash Collision?
At its core, a hash table is an array where each element represents a hash bucket. The first element is bucket 0, the second is bucket 1, and so on. When a key-value pair is inserted, the key is processed by a hash function, and the result is taken modulo the number of elements in the array. This gives the index (or bucket) where the key-value pair will be stored.
For example, as shown in the diagram below, after hashing key1, it maps to bucket 1. Similarly, key3 and key16 map to buckets 7 and 4, respectively.
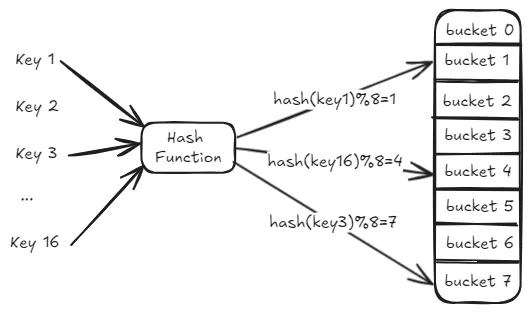
From the diagram, we see that there are 16 keys to store, but the hash table only has 8 available slots. This leads to a situation where multiple keys are assigned to the same bucket, resulting in a hash collision.
In practical use, it’s often difficult to predict exactly how much data will need to be stored in a hash table. Creating an oversized hash table upfront can lead to wasted space if the data volume remains low. For this reason, hash tables are typically initialized with a smaller size, with the expectation that the number of keys (keyspace) will eventually outgrow the initial table size.
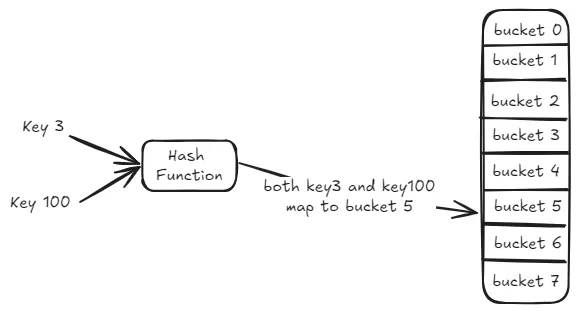
This mismatch between keyspace and hash table size inevitably causes different keys to be mapped to the same bucket by the hash function, resulting in hash collisions. If each bucket can only store a single key-value pair, this limits the hash table’s ability to manage large datasets effectively. For example, if both key3 and key100 are mapped to bucket 5, and bucket 5 can only hold one key, one of the keys would fail to be stored in the hash table.
To resolve hash collisions, two common solutions are used:
- Chaining, which I’ll introduce next, allows multiple keys to be stored in the same bucket by linking them in a list. However, it’s important to ensure that chains don’t become too long, as this can degrade the hash table’s performance.
- Rehashing, which redistributes the keys when the chain length exceeds a certain threshold. Rehashing can be costly, but Redis mitigates this with incremental rehashing, which spreads the rehashing process over time.
Let’s now explore how chained hashing is designed and implemented to handle hash collisions.
How is Chained Hashing Designed and Implemented?
Chained hashing is a technique where keys mapped to the same bucket in a hash table are linked together using a linked list. Let’s explore how Redis implements chained hashing and why it’s effective in resolving hash collisions.
First, we need to understand how the hash table is implemented in Redis. The source code related to Redis’s hash table can be found in two main files: dict.h and dict.c. The dict.h file defines the structure of the hash table, hash entries, and various operation functions, while dict.c contains the actual implementation of these operations.
In dict.h, the hash table is defined as a two-dimensional array (dictEntry **table), where each element is a pointer to a hash entry (dictEntry). The following code snippet shows how the hash table is defined in dict.h.
1 | /* This is our hash table structure. Every dictionary has two of this as we |
To implement chained hashing, Redis’s dictEntry structure is designed to include a pointer not only to the key and value but also to the next hash entry. This is what creates the linked list for handling collisions. As shown in the code, the dictEntry structure includes a pointer, *next, which points to another dictEntry structure—this is how Redis implements chained hashing.
1 | typedef struct dictEntry { |
In addition to the next pointer for chaining, there’s another interesting detail worth noting. The value in the key-value pair is defined by a union, v, in the dictEntry structure. This union includes a pointer to the actual value (*val), as well as fields for storing an unsigned 64-bit integer, a signed 64-bit integer, or a double value.
The reason I’m pointing this out is that this design choice is a clever memory-saving technique. When the value is an integer or a double, which are 64-bit types, there’s no need for an additional pointer to store the value. Instead, the value can be stored directly within the key-value structure, reducing the need for extra memory.
At this point, you should have a solid understanding of how Redis implements chained hashing. But you might still be wondering how this helps resolve hash collisions.
Let me explain using an example: both key3 and key100 are mapped to bucket 5 in the hash table. With chained hashing, bucket 5 doesn’t just store key3 or key100—instead, it uses a linked list to connect key3 and key100, as shown in the diagram below. As more keys are mapped to bucket 5, they are all linked together in a list, thus managing the collisions.
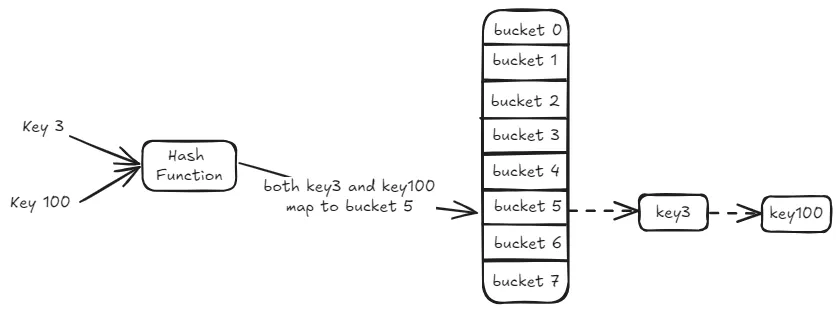
When we want to search for key100, we start by computing its hash value and finding that it maps to bucket 5. We then traverse the linked list in bucket 5, comparing each key until we find key100. This is how chained hashing allows us to resolve collisions and locate the desired entry.
However, there is a drawback to chained hashing. As the linked list in a single bucket grows longer, the time it takes to search for a key in that bucket increases, which can degrade the overall performance of the hash table.
So, is there a way to minimize the performance impact? Yes! That brings us to the next topic: the design and implementation of rehashing.
How does Redis Implement Rehashing?
Rehashing in Redis essentially refers to expanding the size of the hash table. The basic approach Redis takes to implement rehashing is as follows:
- Redis uses two hash tables alternately during rehashing. As I mentioned earlier, Redis defines the hash table using the
dicthtstructure indict.h. However, when actually using the hash table, Redis also defines adictstructure in the same file. This structure contains an array (ht[2]) with two hash tables:ht[0]andht[1]. Thedictstructure is defined in the code as follows:
1 | typedef struct dict { |
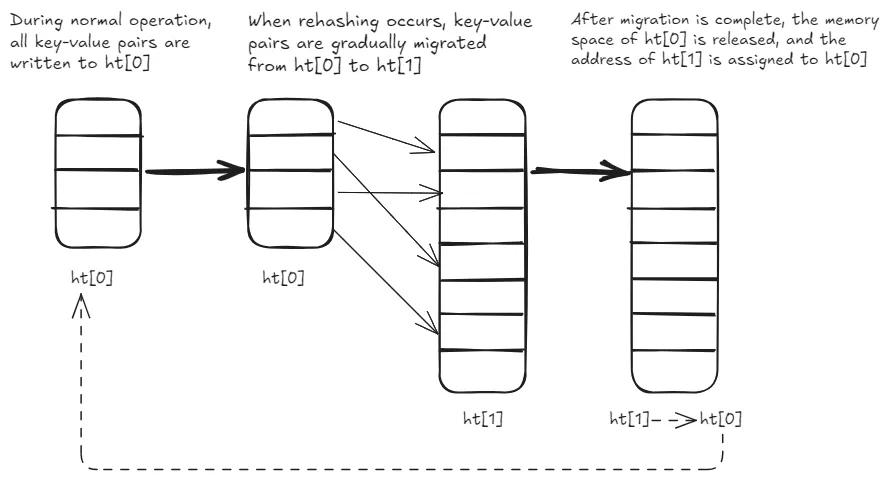
- During normal operation, all key-value pairs are written to
ht[0]. - When rehashing occurs, key-value pairs are gradually migrated from
ht[0]toht[1]. - After migration is complete, the memory space of
ht[0]is released, and the address ofht[1]is assigned toht[0]. Then, the size ofht[1]is reset to zero. At this point, Redis resumes normal operations, withht[0]handling requests andht[1]reserved for the next rehash.
To help you understand this alternating process between ht[0] and ht[1], I’ve included a diagram below.
Now that you have a basic understanding of how Redis alternates between two hash tables to implement rehashing, let’s discuss some important questions that need to be addressed during rehashing. I believe there are three key issues to consider:
- When should rehashing be triggered?
- How much should the hash table be expanded?
- How should rehashing be carried out?
Next, I’ll walk you through the code implementation for each of these questions, so you can clearly see how Redis handles these aspects of rehashing.
When Should Rehashing Be Triggered?
To determine when rehashing is needed, Redis uses the function _dictExpandIfNeeded. Let’s first look at the conditions within this function that trigger resizing, and then explore where this function is called in the Redis codebase.
There are three conditions defined in the _dictExpandIfNeeded function that can trigger expansion:
- Condition 1: The size of
ht[0]is zero. - Condition 2: The number of elements in
ht[0]exceeds its current size, and the hash table can be resized. - Condition 3: The number of elements in
ht[0]is a multiple of the table size, defined bydict_force_resize_ratio(which defaults to 5).
Here’s a snippet of the code defining these conditions in the _dictExpandIfNeeded function:
1 | /* Expand the hash table if needed */ |
For the first condition, if the hash table is empty, Redis simply sets the table to its initial size, which is part of initialization, not rehashing.
Conditions two and three, however, correspond to rehashing scenarios. In both cases, Redis compares the number of elements in the hash table (d->ht[0].used) with the table’s current size (d->ht[0].size). This ratio is known as the load factor. Redis triggers rehashing when the load factor is either equal to or greater than 1, or greater than 5.
When the load factor exceeds 5, it indicates that the hash table is severely overloaded and needs to be resized immediately. If the load factor is 1 or greater, Redis checks the value of the variable dict_can_resize to determine if resizing is currently allowed.
You may wonder, what exactly is the dict_can_resize variable? This variable is controlled by two functions: dictEnableResize and dictDisableResize, which enable and disable hash table resizing, respectively:
1 | void dictEnableResize(void) { |
These functions are wrapped within updateDictResizePolicy. This function enables or disables rehashing based on whether Redis is currently running an RDB snapshot or AOF rewrite process. If neither process is running, rehashing is allowed:
1 | void updateDictResizePolicy(void) { |
Now that we understand the conditions for triggering rehashing in _dictExpandIfNeeded, let’s look at where this function is called in Redis. By examining the dict.c file, we can see that _dictExpandIfNeeded is invoked by the _dictKeyIndex function, which is itself called by dictAddRaw. The dictAddRaw function is then called by three key functions:
dictAdd: Adds a key-value pair to the hash table.dictReplace: Adds a key-value pair or replaces an existing one.dictAddOrFind: CallsdictAddRawdirectly.
Thus, every time Redis adds or modifies a key-value pair, it checks whether rehashing is necessary. The following diagram illustrates the call relationships leading to _dictExpandIfNeeded.
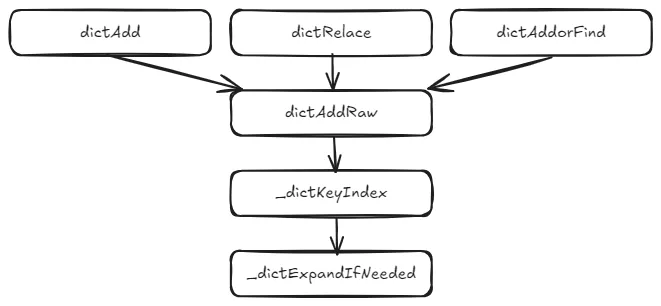
In summary, the key functions responsible for triggering rehashing in Redis are _dictExpandIfNeeded and updateDictResizePolicy. The former checks the load factor and whether resizing is allowed, while the latter enables or disables resizing based on RDB and AOF processes.
Next, we’ll explore the second major question in rehashing: how much should Redis expand the hash table?
How Much Should the Hash Table Be Expanded?
In Redis, when resizing the hash table space due to rehashing, it calls the **dictExpand** function. This function takes two parameters: the hash table to be resized (**dict *d**) and the target size (**unsigned long size**). The prototype of the **dictExpand** function is shown below:
1 | int dictExpand(dict *d, unsigned long size); |
To determine whether resizing is needed for a hash table, we use the **_dictExpandIfNeeded** function. Once resizing is deemed necessary, Redis expands the hash table during rehashing by doubling its current size (**size * 2**) if the current table’s used space is **size**, as illustrated in the following code snippet:
1 | dictExpand(d, d->ht[0].used + 1); |
The actual resizing process in the **dictExpand** function is managed by the **_dictNextPower** function. This function continuously doubles the hash table’s initial size (**DICT_HT_INITIAL_SIZE**) until it reaches the target size, as shown in the code snippet below:
1 | /* Our hash table capability is a power of two */ |
Now, let’s delve into Redis’s approach to addressing the third issue: how to execute rehashing. Essentially, this involves Redis implementing a incremental rehashing design.
How is Incremental Rehashing Implemented?
First, let’s clarify why we need incremental rehashing in the first place. When a hash table undergoes rehashing, the hash table space expands, and keys that were mapped to certain positions may now need to be relocated to new ones. This means many keys must be copied from their old positions to new ones. During this key copying process, Redis’s main thread is unable to handle other requests, causing the rehashing process to block the main thread and lead to performance overhead.
To mitigate this overhead, Redis introduced the concept of incremental rehashing.
In simple terms, incremental rehashing means Redis doesn’t copy all the keys from the current hash table to the new one in a single operation. Instead, it copies them in batches, with each operation only transferring keys from one bucket at a time. This limits the duration of each copying operation, thereby reducing its impact on the main thread.
So, how is incremental rehashing implemented in the code? There are two key functions involved: dictRehash and _dictRehashStep.
Let’s start with the dictRehash function, which performs the actual key copying. It takes two input parameters: the global hash table (which consists of the dict structure holding ht[0] and ht[1]) and the number of buckets to be rehashed.
The logic of the dictRehash function is divided into two parts:
- First, it runs a loop, copying the keys in each bucket according to the specified number of buckets
n. Of course, if all the data inht[0]has already been transferred, the copying loop stops. - Second, after copying
nbuckets, the function checks whether all the data inht[0]has been migrated. If so, the space forht[0]is released. Since Redis always referencesht[0]when handling requests, once the rehashing process is complete and the data is fully inht[1], Redis assignsht[1]toht[0], ensuring that other parts of the code can continue functioning as expected. After this, the size ofht[1]is reset to zero in preparation for the next rehash. At the same time, the global hash table’srehashidxvariable is set to -1, indicating that the rehash process has finished (I’ll explain the purpose of therehashidxvariable shortly).
Here’s a diagram that illustrates the primary steps of the dictRehash function.
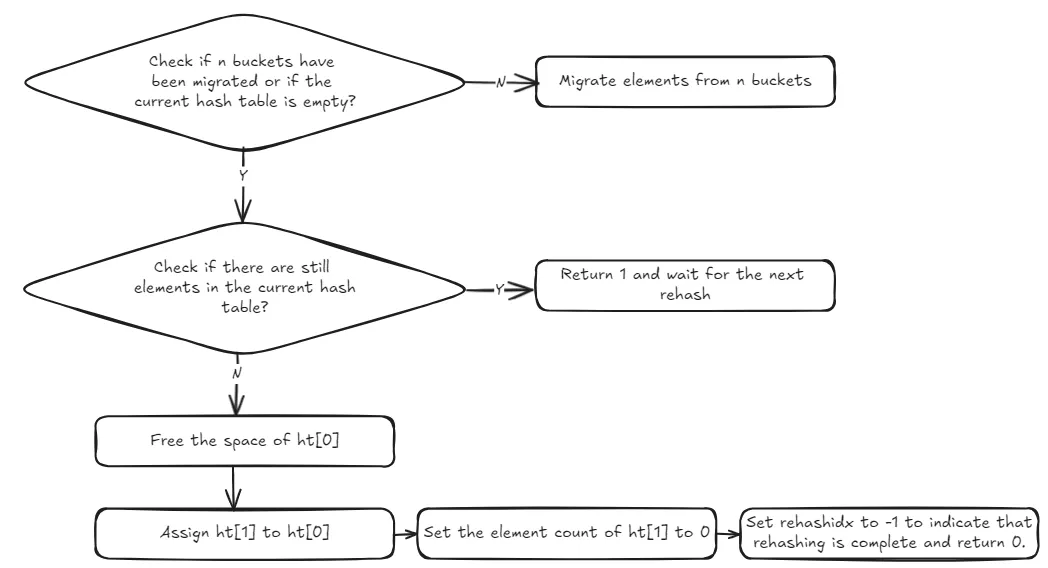
You can also check the code snippet below to better understand its logic.
1 | /* Performs N steps of incremental rehashing. Returns 1 if there are still |
Now that we’ve covered the core functionality of the dictRehash function, let’s explore how incremental rehashing works by migrating data at the bucket level. This is where the rehashidx variable in the global hash table structure comes into play.
The rehashidx variable indicates which bucket is currently being migrated. For instance, when rehashidx is 0, the first bucket in ht[0] is being migrated; when it’s 1, the second bucket is being migrated, and so on.
The main loop in the dictRehash function checks whether the bucket pointed to by rehashidx is empty. If it is, rehashidx is incremented, and the next bucket is examined.
But is it possible for multiple consecutive buckets to be empty? Yes, it is. In such cases, incremental rehashing doesn’t just keep incrementing rehashidx indefinitely. The reason is that during rehashing, the Redis main thread is unable to handle other requests. Therefore, Redis introduces a variable called empty_visits to track how many empty buckets have been checked. After a certain number of empty buckets have been examined, the current round of rehashing stops, allowing Redis to process external requests and avoid performance degradation. You can see this logic in the code snippet below.
1 | while(d->ht[0].table[d->rehashidx] == NULL) { |
If the bucket that rehashidx points to contains data for migration, Redis will take each hash entry from that bucket, recalculate its new position in ht[1] based on the size of ht[1], and insert the hash entry into the appropriate bucket in ht[1]. Each time a hash entry is migrated, the used variables in ht[0] and ht[1] (which track how many entries each table holds) are updated—used in ht[0] decreases by one, while used in ht[1] increases by one. Once all data in the current bucket is migrated, rehashidx is incremented, and the process continues with the next bucket. The code snippet below illustrates this migration process.
By now, we’ve covered the complete logic of the dictRehash function. We know that dictRehash migrates hash entries on a bucket-by-bucket basis, with the number of buckets processed being determined by the loop count parameter n. Whenever Redis performs a rehash operation, it eventually calls the dictRehash function.
Next, let’s look at the second key function involved in incremental rehashing: _dictRehashStep, which performs rehashing one bucket at a time. According to Redis’s source code, there are five functions that call _dictRehashStep, which in turn calls dictRehash to carry out the rehashing process. These functions are: dictAddRaw, dictGenericDelete, dictFind, dictGetRandomKey, and dictGetSomeKeys.
The functions dictAddRaw and dictGenericDelete are used to add and delete key-value pairs in Redis, while the other three functions are for querying. The diagram below shows the relationships between these functions.

It’s important to note that regardless of whether you’re adding, deleting, or querying, when these five functions call _dictRehashStep, the loop count parameter n passed to dictRehash is always set to 1, as shown in the following code:
1 | static void _dictRehashStep(dict *d) { |
This means that after migrating a single bucket, the hash table is free to handle regular add, delete, or query operations. This is how incremental rehashing is implemented at the code level.
Conclusion
Creating a high-performance hash table is not only a priority for Redis but also a crucial goal in the development of many computer systems. To build an efficient hash table, two key issues need to be addressed: hash collisions and the overhead of rehashing.
In this article, we explored the structure of Redis’s hash table, the implementation of chained hashing, and the design and implementation of incremental rehashing. Redis’s hash table structure is unique—each hash entry contains a pointer, enabling chained hashing. Additionally, Redis uses a global hash table that contains two hash tables, a design that facilitates data migration from one table to another during rehashing.
The incremental rehashing mechanism in Redis is a general method for hash table expansion and is worth studying. Its core idea is to migrate only a limited number of buckets at a time, preventing performance issues that arise from migrating all buckets in one go. Once you understand the concept and implementation of incremental rehashing, you can apply it to your own hash table designs.

